
Lesson Summary
In this lesson, students participate in a scientific field study* and apply what they have been learning about native and invasive crayfish.
They first learn to safely collect reliable data from a nearby freshwater ecosystem. Then they analyze the data and present it visually.
By participating in the project, students develop an understanding of the power of community science to help monitor invasive and native species and improve watershed health. Students are strongly encouraged to complete prior lessons before beginning this study.
*A scientific collection permit is required for the crayfish study, and approval may take up to 4 months. Plan early to avoid delays.
Photo Credit: Illinois-Indiana Sea Grant

Objectives
Students will accomplish the following goals upon completing this lesson:
- demonstrate techniques for safely collecting and then submitting accurate data about the distribution of crayfish species.
- experience the power of monitoring invasive and native species to assist researchers and wildlife managers and improve the health of their local watershed.
- be encouraged to be better stewards of their local watersheds.
Students will meet the following objectives upon completing this lesson:
- follow a scientific protocol to measure and record data about crayfish specimens in a natural freshwater ecosystem.
- analyze data collected as a class and create visualizations with it.
- show visually and explain verbally how energy from the sun and photosynthesis forms the foundation of freshwater ecosystems.
- express orally and/or in writing what they have learned about native and invasive crayfish and their impacts on freshwater ecosystems.

Lesson Alignment
Next Generation Science Standards: Building Toward: MS-LS1-4, MS-LS2-1, MS-LS2-4, MS-ESS3-3, HS-LS2-2, HS-LS2-6.
Next Generation Science Standards: Crosscutting Concepts Stability and Change, Structure and Function
Next Genertion Science Standards: Science & Engineering Practices Asking Questions and Defining Problems, Constructing Explanations (for science) and Designing Solutions (for engineering), Obtaining, Evaluating, and Communicating Information.
Next Generation Science Standards Core and Component Ideas in Life Science: LS1.A, LS1.B, LS2,
Next Generation Science Standards Core and Component Ideas in Earth and Space Science: ESS2.C
Common Core State Standards
Speaking and Listening Standards for Gr. 6- S1, S4, S6 (Similar standards exist for Gr.4-5 and 7-12)
Math Standards: Measurement & Data- Represent and interpret data
Math Standards: Statistics & Probability- Develop understanding of statistical variability, Summarize and describe distributions.
Materials
Access printed copies or electronic versions of lesson materials below.
- The Invasive Crayfish Collaborative (email provided below) can help provide your class with collection equipment such as: overnight crayfish traps, bait, seine nets with poles, kick nets or D nets, i.d. books, boots or waders.
- Optional: GPS device(s) and/or smartphone(s) to collect latitude and longitude data
- Optional: Digital camera(s) and/or smartphone(s) to photograph specimens
- Optional: Thermometer(s) or probes for testing water and air temperature
- Optional: Field map(s) and/or smartphones with Google Maps app (or similar, if you expect to have coverage)
- Pencils, rulers or calipers, coolers with ice, bucket, gallon-size plastic bags, colored pencils or markers
- Sampling permits if required
- Field clothing, student field journals,
- Optional: Digital scale and mesh bag, magnifying devices such as hand lenses or macro lenses to attach to smart phones/tablets
- Optional: Buoys
Background Information for Educator
A little more about this lesson
Contact the Invasive Crayfish Collaborative
Help with traps, ropes, nets, bait, identification books, boots or waders
Crayfish Identification Books
Such as: The Field Guide to Crayfishes of the Midwest
Crayfish Sampling Sheets
Make plenty of copies for student groups.
“Native and Invasive Crayfish of the Great Lakes Region”
Reading
Great Lakes Crayfish iNaturalist Project Page
Use tablets and smartphones to submit data directly from the field!
Invasive Crayfish Collaborative Website
We can provide you with support to work with your class.
Obtain a Free Scientific Permit
The Illinois Department of Natural Resources requires each classroom participating in this program in Illinois to complete a free “Scientific Collecting Permit”.
Illinois Site Permit
If you will be collecting on State of Illinois land you will also need to fill out the “Illinois Site Permit”.
Student Permission Forms
One per student
“How to Photograph Crayfish for iNaturalist”
Instructions for crayfish photos
Determine Longitude and Latittude
Instructions for recording crayfish location
Convert Location Information
Online location conversion tool
American Crayfish Atlas
Match findings with those of crayfish scientists and other data collectors.
“Crayfish Dissection” page from Biology Junction
Guidance for Crayfish Dissection
“Crayfish Dissection” Video Resource1
Guidance for Crayfish Dissection
“Crayfish Anatomy”1
Anatomy
“Seining at the River”1
Kick net/seine demonstration
Investigating Crayfish and Freshwater Ecosystems
Full Curriculum
1 Disclaimer: The linked YouTube video below may contain advertisements that can interrupt viewing. These ads are typically placed by content creators or YouTube and may vary in length and frequency.
Time Required
Completion of this lesson may require 45 minutes or more plus travel time to complete. Overnight preparation is suggested.
Activity Set-Up
Obtain a scientific collection permit if required in your area to collect crayfish. Illinois classrooms see materials list. Other Great Lakes states see Expand Knowledge & Skills below. Other state permits can likely be found at your Department of Natural Resources.
Obtain Illinois site permit. See materials list.
Visit the “Great Lakes Crayfish” iNaturalist project page to prepare to submit data. See materials list.
Prepare students with a safety briefing focusing on live specimin collection. Details listed in lesson.
Select an ideal location to collect crafish. Tips listed in lesson.
Obtain student permission forms provided in materials list.
Make decisions about trap setting. Details in lesson.
Photo credit: Illinois-Indiana Sea Grant

Optional: Review the information about native and invasive crayfish at the end of lesson 4 of this curriculum. Additional sources are listed in the Expand Knowledge + Skills section at end of the lesson, which could also help you prepare to answer student questions.
Lesson
Engage
- Tell students they will be able to collect important data about the native and invasive crayfish species found nearby. The data will be shared with university researchers and wildlife managers in states around the Great Lakes region.
- Ask students to form groups of 2–4. Show them the available equipment, such as traps, nets, and waders, and ask them to think about what specific techniques they could use to catch crayfish safely based on what they have learned about crayfish and freshwater ecosystems.
- Ask them to quickly brainstorm their ideas, recording them in science notebooks or with an electronic device.
- Circulate through the room to answer (and ask) questions. Tell students when they have one more minute to brainstorm and be ready to share their best ideas.
- Ask the groups to share their ideas and demonstrate possible techniques to the class.
- Optional if time allows: Ask the groups to think of questions about crayfish that may live nearby and where they might be easy to find.
- Ask them to brainstorm and record their ideas.
- Circulate through the room to answer (and ask) questions.
- Ask the groups to share their ideas and discuss how they will now be able to apply everything they’ve been learning about crayfish to do actual field research in a nearby freshwater ecosystem.
- You and/or experienced students can demonstrate recommended techniques for how to use the equipment such as crayfish traps and nets. This can be done in the classroom and/or in the field.
- If traps will be used, explain how to tie a rope to the trap clip. If you are using cat food for bait, explain that before they toss in traps, they will punch holes in the top of a can with a nail or screwdriver and attach it to the inside bottom of the trap. Or they will add a half cup (113 grams) of dog food per trap. It is recommended that leaves, sticks or other vegetation also be added to traps to provide cover for any trapped fish and crayfish and help them avoid predation.
- Tell students that the most important step in throwing traps into a waterbody is to always remember to hold the end of the rope! They need to completely submerge the traps under water. Then they should tie the rope to something secure on shore, such as a tree.
- If buoys (or empty plastic bottles) will be used with traps, show how to add your name, contact information, and permit number (if applicable) to them. That information can also
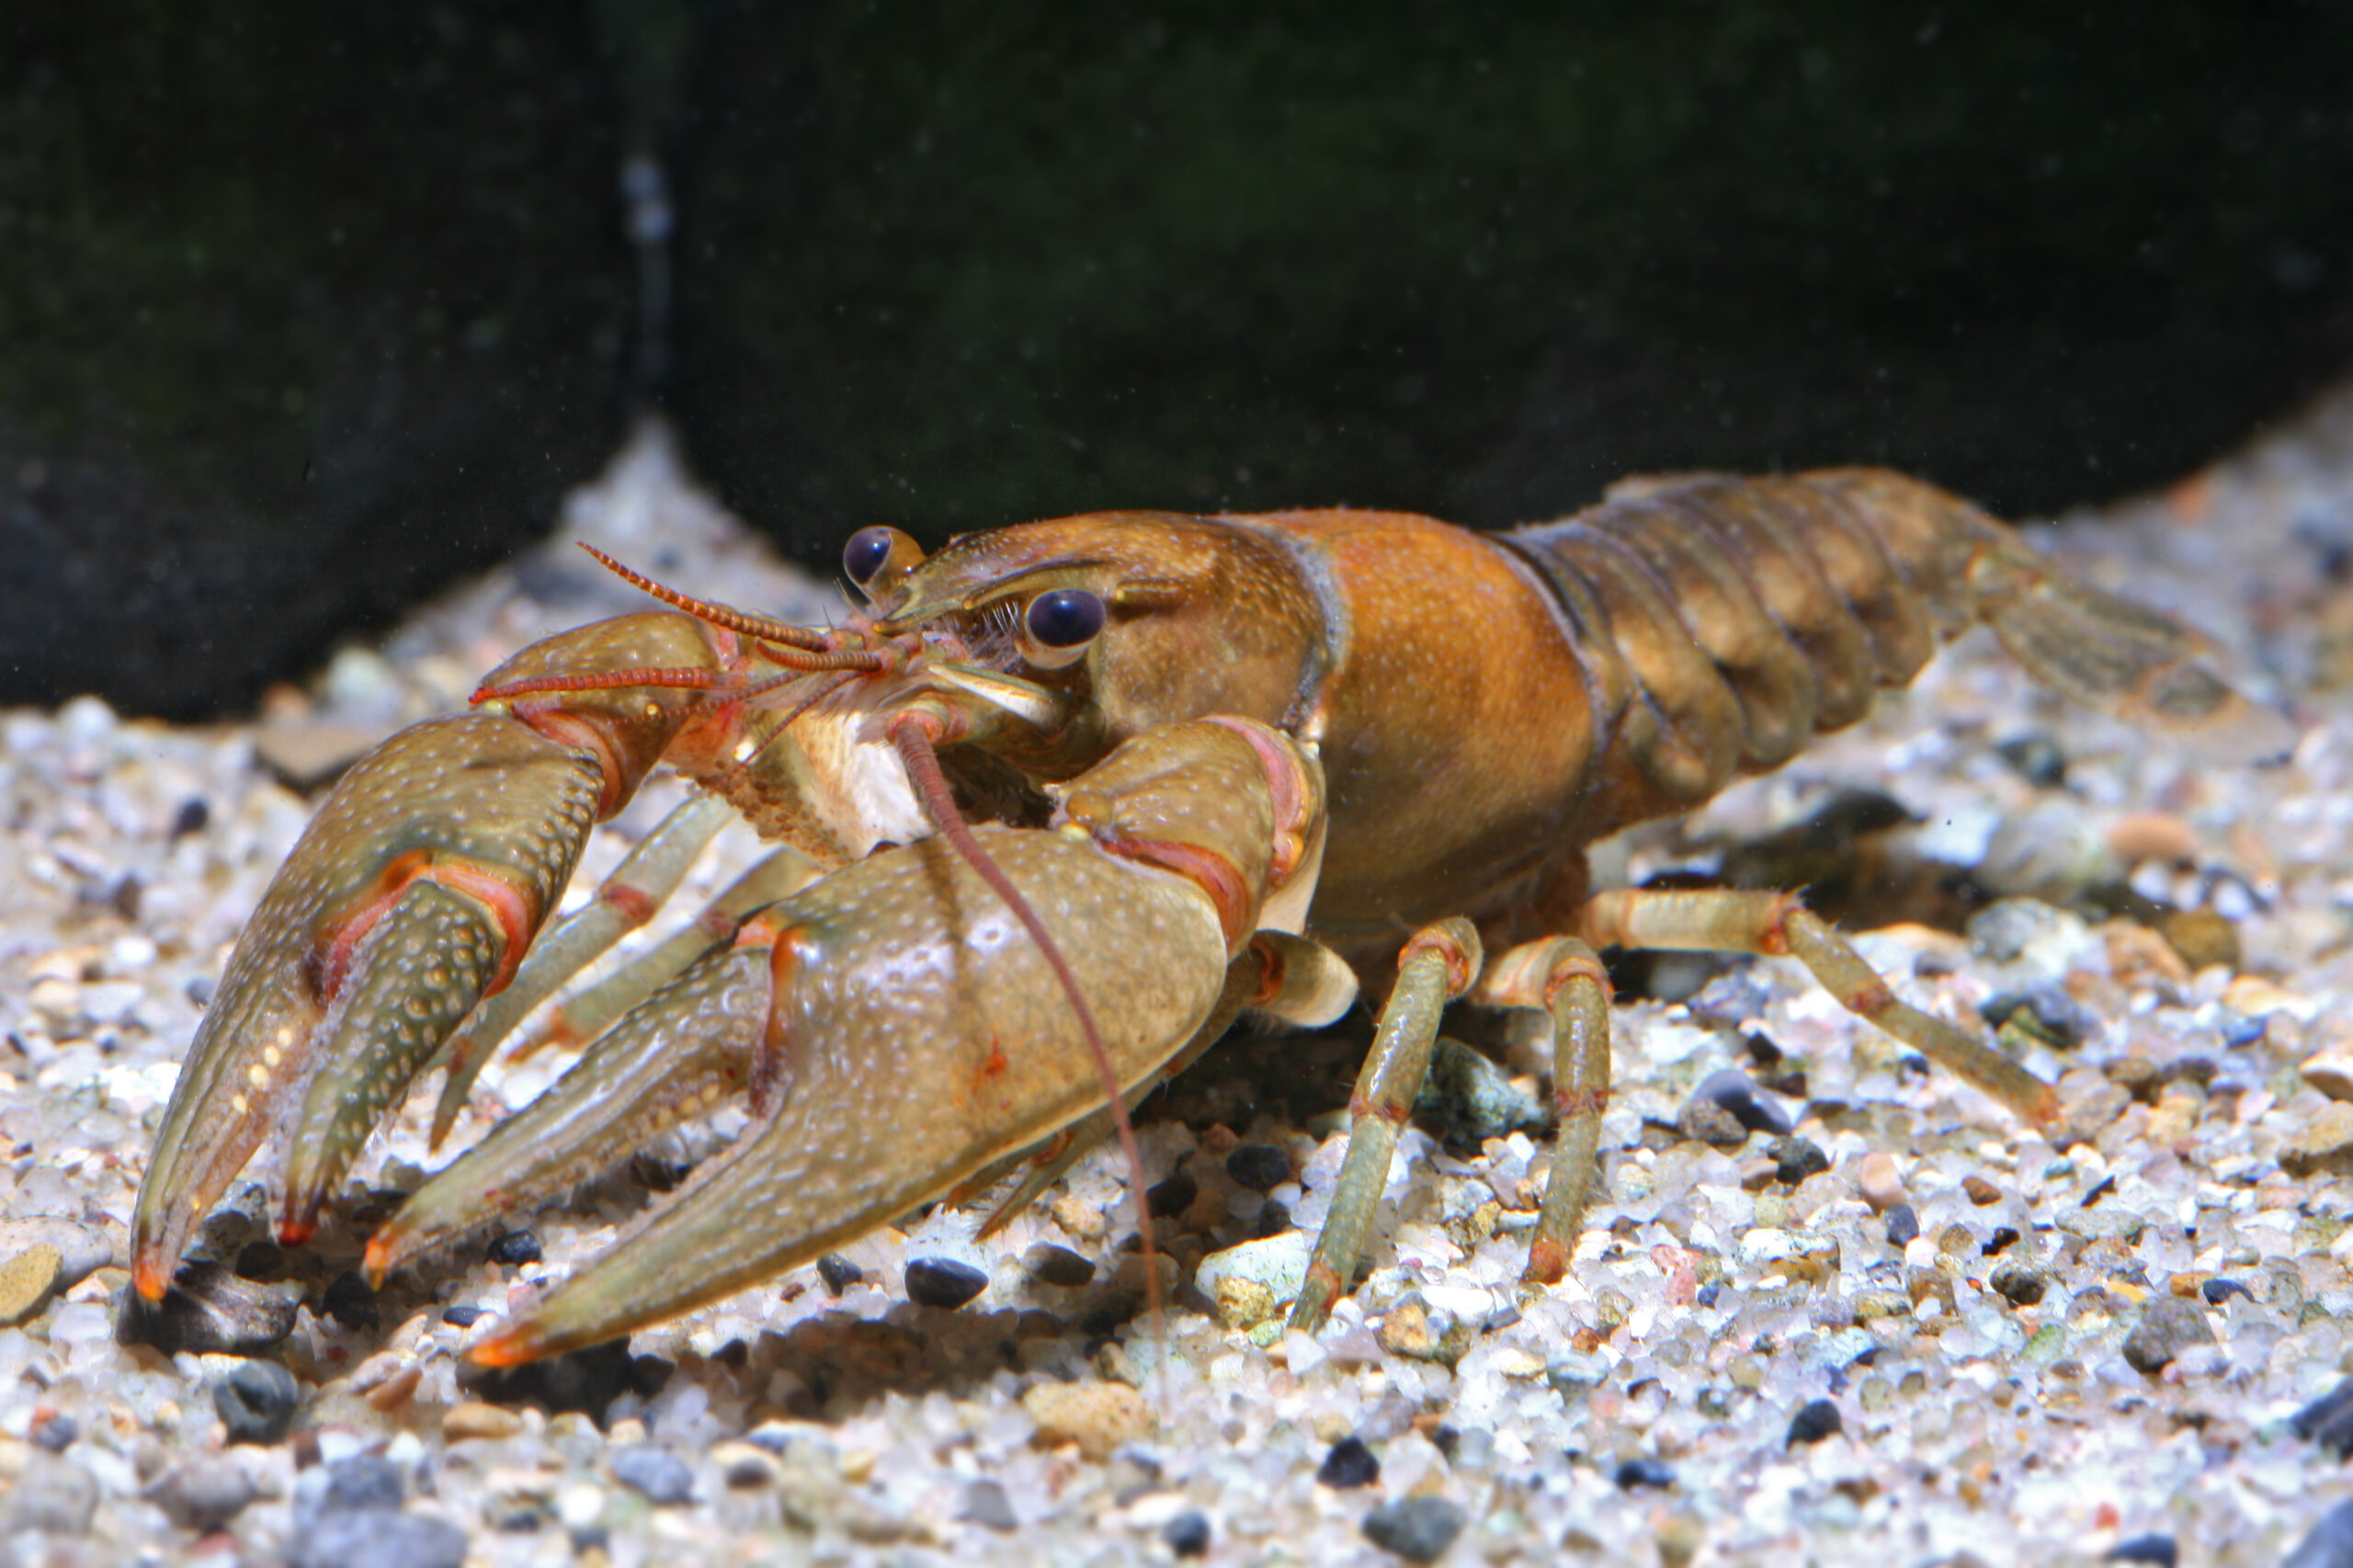
- Safely handling crayfish and reducing risk of harm to them and their ecosystems:
- Ask students how they think they should hold live crayfish.
- Discuss how they should hold them from the back of the carapace to avoid being pinched and/or avoid hurting the crayfish.
- Tell students they should return native specimens to the waterbody where you caught them after photographing and identifying them. Explain that they should never release any organisms into areas from which they did not originate. If you or your students find an invasive crayfish, please do not return it to the waterbody. Instead, place it in a plastic bag and euthanize it by placing it in a freezer overnight. Tell students that by doing so, they are helping the rest of the organisms in the ecosystem.
- Tell students that if they need to handle crayfish for more than a few minutes, they can dunk the crayfish in water to allow them to rewet their gills.
- Explain that crayfish may shed their chelae (claws) as a defense mechanism if they are held by their tips, so students should be very careful not to do that.
- Photographing crayfish:
- Guide students through the process of correctly photographing crayfish as shown in the photos below and described here:
- A. From above with a ruler or coin for scale
- B. Close up on chelae (claws)
- C. From the side
- D. From the underside (ventral view) to clearly see the reproductive structures, also known as gonopods in males
- When photographing more than one crayfish, include a numbered note card and/or numbers or letters added with a computer in one or more of the photos. This will help to keep track of the crayfish when reporting on iNaturalist. Additional tips for taking pictures of crayfish can be found on the “How to Photograph Crayfish for iNaturalist” in the materials list.
- Guide students through the process of correctly photographing crayfish as shown in the photos below and described here:
- Discuss with students how to record location information:
- You might first ask students what they know about latitude and longitude and why these coordinates are useful. Then ask how they might find that information. Discuss their ideas and clarify any misunderstandings. Details and clear visuals about latitude that you might add are linked in the materials list. Note the “What is longitude?” button on the right. Depending on the level of your students, you could share more technical details during the Explain part of the lesson (after your field study), when discussing the student’s location data.
- Tell students that latitude and longitude coordinates are reported for this scientific study through the iNaturalist platform, which uses the decimal degree format. When submitting observations, click on the map to see the latitude and longitude coordinate information at the top:
- Other options to find the data include using Google Maps, a smart phone, or a GPS device. Different formats for latitude and longitude are included below. Decimal Degree is the format used by iNaturalist (D= degrees, M= minutes, S=seconds, H=hemisphere)
- Decimal Degree–DDD.DDDDDD°
- Degree Minute Second–DDD° MM’ SS.SS’’ H
- Minute Decimal–DDD° MM.MMM’
- If you need to convert location information, you can use online conversion resources such as the one listed in materials.
- Feel free to contact the Invasive Crayfish Collaborative linked in the materials.
- Discuss behavior expectations for the trip, and how this field investigation is a special privilege that they should enjoy and not want to lose. If desired, ask the class to form research teams of 2–4 students with whom they will work to collect data (or you can choose the groups).

Photographing Crayfish
A. From above with a ruler or coin for scale
B. Close up on chelae (claws)
C. From the side
D. From the underside (ventral view)
Photo credit: Illinois-Indiana Sea Grant
Explore
- Ask students to help you carry the equipment to the research site. Pass out data sampling sheets to student groups (found at the end of the lesson). If traps were set the night before, students can pull them in and collect and record the data on the sheet.
- Demonstrate the use of other available equipment, such as:
- Seine nets, which are used to catch crayfish stirred up from the stream bottom. Attach seine net ropes to poles. The seine net should be oriented as pictured below. This method requires two people in the stream to hold a seine net downstream while one or more people upstream disturb the stream bottom by shuffling their feet or flipping rocks.
- Have two people, one person holding each pole, spread the net out across the stream with the weighted side on the bottom of the stream and the floats above the water.
- Seine net holders should stand 1–2 feet downstream from one or more feet-shufflers.
- Feet-shufflers should walk upstream of the net, dragging their feet to stir up the stream bottom as the net-holders walk slowly upstream behind them.
- Use your best judgment on the amount of time and distance for seine netting. We recommend about five minutes or 15 feet. Record the number of shufflers, time spent shuffling, and distanced shuffled.
- Once finished, remove nets and their contents from the stream by scooping the weighted bottom of the nets up towards upstream.
- Place the net with the contents right-side-up on the stream bank. Collect crayfish by hand and place them in buckets. If many crayfish are caught, placing some pieces of PVC pipes in the buckets will give them a place to hide and reduce their stress. Note: You might catch fish and other invertebrates with this method. Place other species you wish to view in a bucket separate from any crayfish or return them to the stream. (Placing other species in a separate bucket is important to eliminate the risk crayfish will predate upon them.)
- Identify crayfish and collect data using the “Seining for Crayfish” data sheet at the end of the lesson.
- Kick nets: Similar to seine nets, crayfish are stirred up from the bottom of a stream into a net downstream that is usually held by two people. The net is then carefully lifted out of the stream. Contents are observed and sifted through by hand as described above.
- A very low-cost kick net can be created by stapling synthetic window screen to two dowels or other light pieces of wood:
- D-nets: Participants can hold D-nets on poles to catch crayfish or work with a partner to catch them:
- As with the other methods using a net, it should touch the bottom of the stream. If one person is collecting, they can stand upstream and shuffle their feet, kicking up rocks and substrate.
- If two or more people are collecting, they can hold the net so it is facing upstream while the other participant(s) shuffle(s) their feet, kicking up rocks and substrate.
- Sift through the contents by hand and pick crayfish out and place them in a bucket or tray. If many crayfish are caught, placing some pieces of PVC pipes and/or leaves and sticks in the buckets will give them places to hide and reduce their stress.
- Identify crayfish and collect data. See the “Kicknet Sampling for Crayfish” data form at the end of the lesson.
- We recommend using this method in addition to baited traps or seine/kick netting so that more students can have a hands-on experience. You should also collect more crayfish data!
- Hand catching: Crayfish can also be caught by hand. Tell students that crayfish will attempt to escape by jetting backwards with a fast swish of their tail, so they should be approached from the back, which should also keep students from being pinched!
- Safety reminder: Whenever participants enter the water, the stream water should be no higher than knee height of your shortest participant.
- Seine nets, which are used to catch crayfish stirred up from the stream bottom. Attach seine net ropes to poles. The seine net should be oriented as pictured below. This method requires two people in the stream to hold a seine net downstream while one or more people upstream disturb the stream bottom by shuffling their feet or flipping rocks.
- Tell students that they should fill a bucket with enough water from the stream to submerge crayfish.
- Optional: If you have access to tablets and/or smartphones with internet, students can use them to submit data directly to the iNaturalist form linked in materials.
- Rotate through the groups, answering questions and helping students to correctly measure and record the data about the crayfish specimens.
- After all the data is recorded and specimens have been photographed, students can also record any additional observations and/or illustrations in field journals.
- Baited traps can be tossed back in if another sample is desired. Since crayfish are generally nocturnal, it may be necessary to leave the traps overnight before another sample can be collected. More samples will result in more reliable data, but whatever data you are able to collect is helpful.
- Tell students that counting zero crayfish in a trap is also important data that can be recorded. A trap could be pulled out empty many times, so students should be prepared with this expectation and know that they did not do anything wrong. However, they may wish to try a slightly different location for their next trap toss—near more rocks that crayfish can use for cover, in a shady area protected from the sun, in deeper water farther out in the stream, etc.
- Work with students to ensure all the materials are collected. Travel back to the classroom.

Explain
- Ask the groups to share their data and observations. Crayfish data can be recorded in a table such as the one below, either on the board, in a shared spreadsheet, etc. If students were not sure of species or gender, photographs can be shared with you and other groups to reach consensus about the two important data points.

- Ask students to work with their group to analyze the data and present it visually. See the “Native + Invasive Crayfish” lesson in this curriculum for strategies to facilitate the process, but we recommend that this activity be an opportunity for students to first work together without your help to explore the data and improve their data analysis and visualization techniques. Tell students they should be able to share at least two interesting visualizations of their crayfish data and be ready to discuss them with the class. Visualization ideas: Younger students could draw a crayfish and add body length data. Older students could graph the relationship between carapace length and weight.
- Circulate through the groups, answering (and asking) questions to help students arrive at their own conclusions. After about 15 minutes, or whenever groups start to finish, tell students they will have two more minutes to work and ask them to be prepared to show and explain their best data visualization(s). If time allows, you can also ask students to explain their visualizations in writing.
- Allow the groups to share their graphs and ideas. Discuss their findings, then ask them to use the “American Crayfish Atlas”, located in materials, to match their findings with those of crayfish scientists and other data collectors.
- Show them how they can click “Map” then select “All Species” to see the data points. Point out how they can zoom in with the “+” button in the lower-right to locate the sampling location(s) they visited.
- Have them compare their observations with those documented on the map. Ask them to develop a list of species that they believe their collected crayfish may be (if they have not yet been identified).
- Close with a discussion about what was learned about the native and/or invasive crayfish at the site and what your research findings might indicate about the health of the freshwater body. If time allows, discuss strategies that can be used to help make the ecosystem healthier.
Extend
If they have not yet done so, ask students to work with a partner to submit their data to the “Great Lakes Crayfish” iNaturalist project. The link is located in materials. First demonstrate the process, then circulate through the groups to answer questions and ensure the data and photos are submitted correctly. This process can also be managed by select trained students.
Invite students to dissect crayfish specimens, which is an especially good option if you euthanized invasive crayfish. Note that it might get messy when dissecting frozen crayfish. You might want to wear gloves and use hand sanitizer before, during, and after dissection. Preserved crayfish can also be purchased from companies such as Carolina Biological. You can show one of the videos in materials to guide students through the process.
Students can view the crayfish specimens and/or their body structures under magnification with a microscope, hand lens, and/or macro lens. You can also use a microscope or macro lens connected to an electronic device and/or data projector to show them to the whole class.
Ask students to record their specimen observations in writing in field journals, labeling illustrations in detail, etc. You can also ask them to write a summary of what they have learned about native and invasive crayfish, using illustrations to better illuminate their points.
Students can create detailed, labeled scientific illustrations of the crayfish species they observe. Photographs they took can be used for reference.
Show one or more short video clip(s) about crayfish and/or data collection techniques, such as: “Crayfish Anatomy,” which has an explanation with visuals of how to determine crayfish sex and/or “Seining at the River”, a kick net/seine net demonstration. These resources are listed in materials.
Invite students to create public service announcement videos about invasive crayfish and ways to keep them from spreading.
Evaluate
Ask students to summarize in writing the process of collecting reliable data for the crayfish study. This could be done in bullet points and/or paragraph form.
Review tables of crayfish measurements, data visualizations, and analyses.
Assess levels of oral participation and student understanding of native and invasive crayfish, how to record scientific data about them and their impacts on freshwater ecosystems.
Students can be asked to reflect on the lesson in writing and/or orally, including about what they learned and what you, as the teacher, might do to improve the lesson next time.
Resources
Expand Knowledge + Skills
- Bowling, Terra (2023). “Great Lakes Crayfish Regulation.” | LINK
- “Crayfish Biology.” Biological Surveys and Assessment Program. University of Illinois | LINK
- “Identifying Crayfish.” Illinois Natural History Survey | LINK
- “Rusty Crayfish: A Nasty Invader.” Univ. of Minnesota Ext. | LINK
- “How one scientist enlisted a lakeside community to study (and eat) invasive crayfish” Cascade PBS | LINK
Data Collection Guidance / Lesson Plans
- Larson, E.R. and Olden, A.D. (2016). “Field Sampling Techniques for Crayfish.” In book: Biology and Ecology of Crayfish, pp.287-324 | LINK
- “Introducing Biodiversity and BioBlitz.” National Geographic | LINK
- “Analyzing BioBlitz Data.” National Geographic: | LINK
- “Connecting Students to Citizen Science and Curated Collections.” North American Network of Small Herbaria | LINK
- Crawfish Educational Materials for Grades K-8 & High School Biology. Louisiana Crawfish Promotion and Research Board | LINK
- “COSIA Outreach Activities- Crayfish Investigations.” Lawrence Hall of Science | LINK
- “Seining at the River.” Kick net/seine net demonstration | LINK
Invasive Species
- “GLANIS: Great Lakes Nonindigenous Species Information System.” NOAA–Great Lakes Environmental Research Laboratory | LINK
- “Invasive Species.” U.S. Fish & Wildlife Service | LINK
- “Transport Zero.” Be A Hero campaign | LINK
Scientific Permit Applications and Resources for Great Lakes States and Provinces
- Illinois | LINK Illinois state sites | LINK
- Indiana | LINK Indiana state sites | LINK
- Michigan | LINK More info | LINK
- Minnesota | LINK
- New York | LINK
- Ohio | LINK How to apply in Ohio | LINK
- Pennsylvania | LINK PA parks and forests | LINK
- Wisconsin | LINK Contact | LINK | for State Natural Areas.
- Ontario and Quebec | LINK Contact your local ministry at | LINK.

This lesson is part of a larger curriculum, Investigating Crayfish and Freshwater Ecosystems.

